እንደ ምርጥ መመሪያ በማክ ላይ ምስል ይዘው ለማንኛውም የሥራ ሂደት
እባኮትን በእኛ የተለያዩ መመሪያዎች ላይ በማክ ላይ የምስል እንደተወሰነ ይወዳድሩ። የተለያዩ የተመለከተ አይነቶች፣ የውስጥ አስተዳደር እና የዘመናዊ የአውታረ መሳሪያዎች እንዲያወቁ ይማሩ።

የተመነጨ ማስተካከያዎች
Your Mac has incredibly powerful, built-in tools for grabbing images—whether you’re snagging a screenshot or pulling photos off your camera. You don’t need to hunt for third-party apps for the basics. Everything you need is already baked right into macOS.
Let's dive into how you can master these native features to build a faster, smarter workflow. We'll cover two key areas:
- Keyboard Shortcuts: These are your best friend for instantly capturing what's on your screen. Think of them as the muscle memory for your Mac.
- The Image Capture App: This is the unsung hero for importing photos and videos from your iPhone, camera, or SD card with total control.
Once you get the hang of these, you’ll be handling nearly all your image capture needs without spending a dime or cluttering your system with extra software.
Nailing the Essential Screenshot Shortcuts
The absolute fastest way to capture your screen on a Mac is with its built-in keyboard shortcuts. They're instant, reliable, and become second nature once you use them a few times.
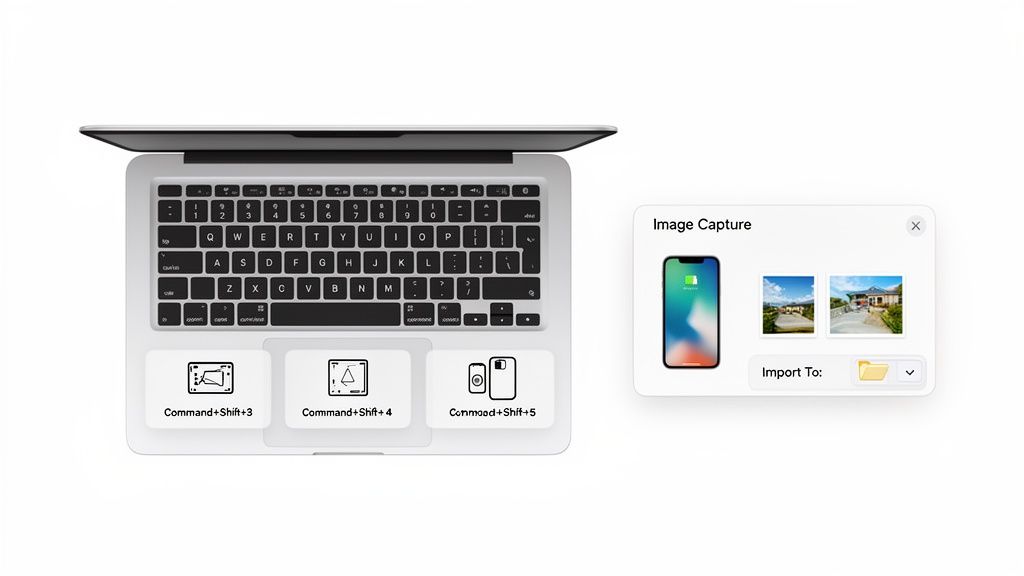
For a quick snapshot of your entire screen, just hit Shift-Command-3. Boom. A PNG file of your whole display instantly saves to your desktop. No fuss, no menus.
Need to be more precise? Use Shift-Command-4. Your cursor will turn into a crosshair, letting you click and drag to select just the part of the screen you want. Let go, and the selected area is saved. If you want to capture a specific window or menu perfectly, press Shift-Command-4, then tap the Spacebar. The cursor changes to a camera icon; just click the window you want to grab.
For a bit more detail on different devices, our guide on how to take screenshots on laptops has some extra tips.
As a quick reference, here are the shortcuts you'll use most often.
Essential macOS Screenshot Shortcuts
| Action | Keyboard Shortcut | Result |
|---|---|---|
| Capture Entire Screen | Shift-Command-3 | Instantly saves a PNG of your full display to the desktop. |
| Capture a Selected Area | Shift-Command-4 | Turns the cursor into crosshairs for a click-and-drag selection. |
| Capture a Specific Window | Shift-Command-4, then Spacebar | Turns the cursor into a camera; click a window to capture it. |
| Open Screenshot Toolbar | Shift-Command-5 | Displays an on-screen control panel with advanced options. |
Memorizing these few combinations will save you a massive amount of time in the long run.
Gaining More Control with the Screenshot App
If you want more options than the basic shortcuts provide, Shift-Command-5 is your ticket. This command brings up a small toolbar at the bottom of your screen, giving you a visual way to manage your captures.
From here, you can choose to capture the screen, a window, or a selection, and you even get options for screen recording. The real power, though, lies in the "Options" menu. This is where you can set a countdown timer, choose a different save location, or turn off that little floating thumbnail that pops up after you take a shot.
Pro Tip: One of the best things you can do for your sanity is to change the default save location. In the Screenshot app's "Options" menu, switch the destination from "Desktop" to a dedicated "Screenshots" folder. This tiny change keeps your desktop clean and makes finding old captures a breeze.
Unlocking Advanced Capture in Native Mac Apps
You might be surprised to learn that some of the most powerful capture tools on your Mac are apps you probably use every day. Beyond basic screenshots, native applications like QuickTime Player and Preview have some serious hidden talents for more complex jobs. They can often replace the need for third-party software entirely, turning your standard image capture on Mac into something much more versatile.
Think of QuickTime Player. It's not just for playing movies; it's a surprisingly robust screen recorder. It’s my go-to for whipping up quick software tutorials, saving a webinar, or grabbing any kind of motion on screen that a static image just can't capture. Best of all, it’s already there, ready to go.
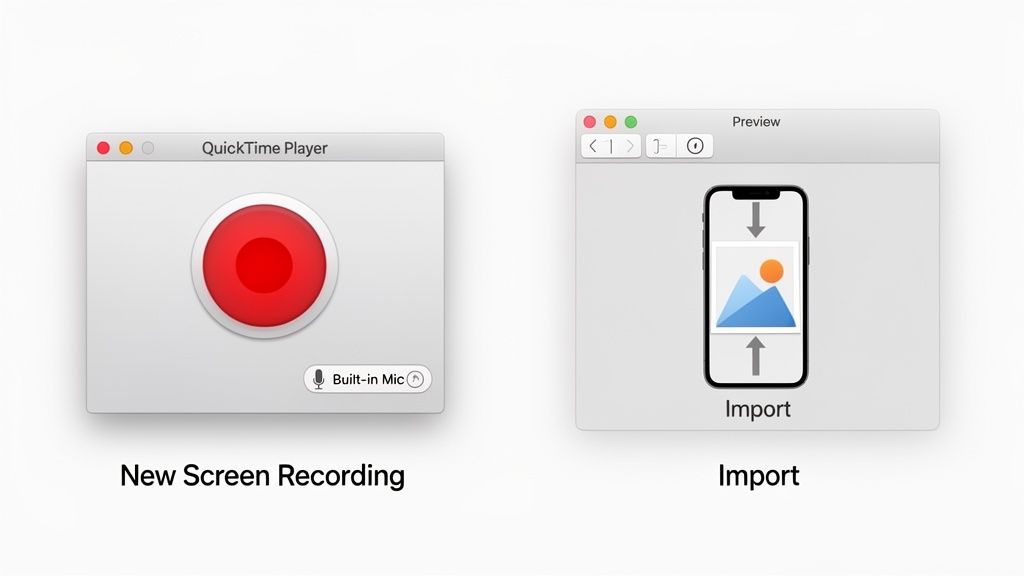
Recording Your Screen with QuickTime Player
Getting a screen recording started is simple. Just pop open QuickTime Player from your Applications folder, head up to the File menu, and choose New Screen Recording. You'll see the same control bar that the Shift-Command-5 shortcut brings up, but this time, it's dedicated to creating a video file.
This little toolbar puts all the important settings right at your fingertips:
- Audio Source: Click into the "Options" menu to decide where your sound comes from. You can use your Mac's built-in mic or plug in an external one, which is a must for clear voiceovers.
- Recording Area: You get to choose between recording your entire screen or dragging a box around a specific section. This is great for keeping your viewer focused and your video files from getting massive.
- Mouse Clicks: There's a handy option to show mouse clicks as a visual circle in the recording. It’s a small touch, but it makes tutorials infinitely easier for people to follow along with.
When you're done, the video opens right up in QuickTime Player. From here, you can even do some light editing. Hitting Command-T brings up the trim function, letting you drag the yellow handles to snip out any awkward pauses at the start or end of your clip before saving it as a .mov file.
Using Preview for Direct Device Imports
Preview is so much more than a simple PDF and image viewer. It's also a powerful tool for pulling images and documents directly from your other Apple devices, turning your iPhone or iPad into a tethered camera or scanner.
Just connect your iPhone to your Mac with a cable. Then, in Preview, go to the File menu and look for Import from [Your iPhone's Name]. This gives you two incredibly useful options:
- Take Photo: This instantly activates the camera on your iPhone. The moment you snap a picture, it appears in a new Preview window on your Mac, completely skipping the Camera Roll.
- Scan Documents: This launches your iPhone's document scanner. It's smart enough to find the edges of a page, fix the perspective, and send a crisp, clean scan straight over to Preview for you to save or mark up.
I find myself using Preview's import function all the time as a faster alternative to AirDrop. It’s perfect when you just need one image or scan because it sends the file directly into an editing app on your Mac, saving you from hunting it down in your Photos library later.
By digging into these features, you can really elevate what you're able to do with the tools that are already built into your Mac.
How to Solve Common Image Transfer Headaches
It’s a familiar story. You plug in your iPhone, ready to offload thousands of photos, only to watch the progress bar freeze. Image Capture hangs, your Mac refuses to see the phone, or it just gives up after importing a handful of files. What should be a simple drag-and-drop task quickly turns into a major headache.
The root of the problem is often the sheer size and volume of our media today. We're not just moving a few JPEGs anymore. We’re trying to transfer thousands of high-resolution HEIC photos and massive 4K ProRes videos, which can easily overwhelm a standard connection. A single minute of ProRes video can be several gigabytes, so you can imagine how quickly a large transfer gets bogged down.
Why Do Big Transfers Stall?
This isn't really a bug—it's more of a practical limitation. You can find countless user reports on forums about built-in tools like Image Capture or Photos struggling with huge libraries. People describe how trying to move 5,000 or 10,000 files at once leads to hangs, partial transfers, or complete failures. You can see some of these transfer challenges on Apple's discussion forums to know you're not alone.
Instead of just crossing your fingers and hoping a massive transfer works this time, a methodical approach is the way to go. A few quick checks and a smarter strategy can save you hours of frustration.
Your Troubleshooting Checklist
When a transfer fails, always start with the simple stuff. Running through these basics in order can often get your image capture on Mac working again without needing any complicated fixes.
- Check the Physical Connection: This is the most common culprit. A cheap or frayed cable just won't cut it. Use an official Apple or MFi-certified cable and plug it directly into your Mac, not through a USB hub.
- Reboot Everything: It sounds too simple, but a classic restart often clears up temporary software glitches. Power down both your Mac and your iPhone, give them a minute, and then turn them back on.
- Reset Trust Settings: If your Mac suddenly acts like it’s never seen your iPhone before, it’s probably a trust issue. On your iPhone, go to Settings > General > Transfer or Reset iPhone > Reset > Reset Location & Privacy. The next time you connect, you’ll be prompted to "Trust This Computer" again.
My go-to strategy for massive libraries is to break the transfer into smaller, manageable chunks. Instead of trying to import 10,000 photos in one go, I’ll do it in batches of 500 or 1,000. Yes, it takes a bit more time upfront, but it’s far more reliable and almost never fails midway through.
Working through these steps systematically will help you diagnose and fix the most common roadblocks. Patience is key, especially when dealing with the enormous file sizes that have become the new normal for our photos and videos.
Using Browser-Based Capture for Modern Workflows
While macOS has some fantastic built-in tools for grabbing images, let's be honest—most of our work lives inside a web browser. Constantly hopping out of your workflow to hit a keyboard shortcut or open an app can really break your concentration, especially when you're doing it over and over. This is where browser-based capture tools really shine, creating a much smoother, more efficient process.
Instead of interrupting what you're doing, you can perform an image capture on Mac without ever leaving the webpage. It's the perfect solution for snagging quick snippets, documenting a specific UI element, or just saving visual information as you find it.
Why a Browser Extension Is Often Better
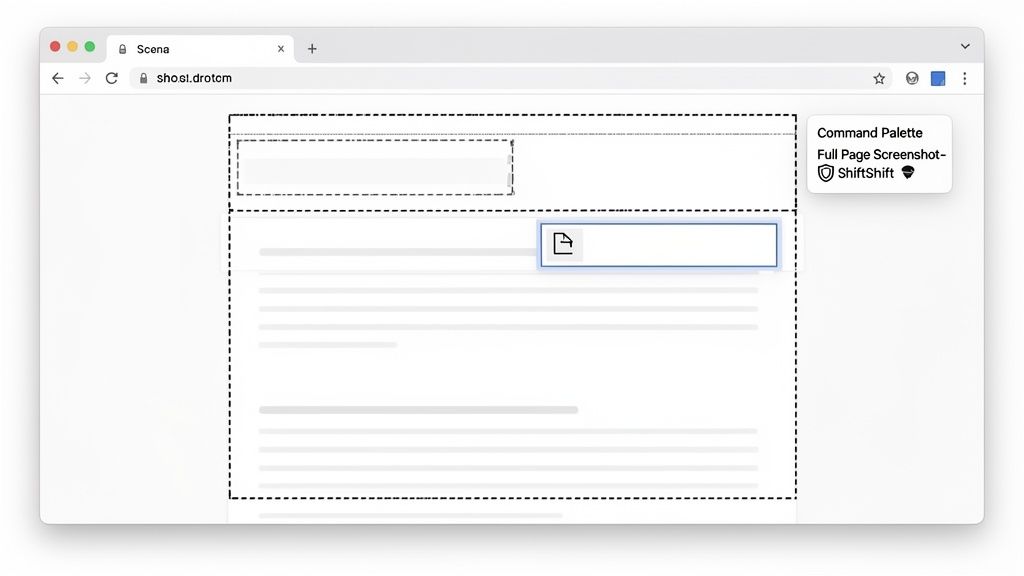
A dedicated browser extension, like the tools in the ShiftShift ecosystem, brings a level of precision that the native macOS tools just can't replicate. These extensions understand the underlying structure of a webpage, which means you can capture specific elements with a single click—no more fussy, manual cropping.
Here’s a quick rundown of the advantages:
- Full-Page Capture: Finally, an easy way to save an entire scrolling webpage as one long, seamless image. For a deeper dive, check out our guide on how to take a full-page screenshot.
- Element Selection: Need to grab just one button, a specific image, or a block of text? You can target it perfectly without capturing any of the junk around it.
- Visible Area: Instantly snaps just the part of the page currently visible in your browser window.
This image shows the ShiftShift 'Full Page Screenshot' tool in action, which you can pull up right from the Command Palette.
This kind of seamless integration means you can start, customize, and save a capture in just a few seconds, keeping you focused on the task at hand.
Privacy and Local Processing
One of the biggest upsides to modern browser extensions is their commitment to privacy. A lot of older, cloud-based screenshot tools would immediately upload your captures to a third-party server. This is a huge potential security risk, particularly if you're dealing with sensitive information.
The ShiftShift Extensions suite is built on a principle of local processing. Every single capture you take is handled right there in your browser. Your data never leaves your computer, which guarantees complete privacy and security.
This "local-first" philosophy is becoming a must-have for professionals and casual users alike. It’s a big reason why developers are putting more effort into high-quality, Mac-specific tooling. With macOS holding a steady global desktop market share of around 8–9%, improving features like privacy-first image capture directly benefits millions of users who rightly expect their data to stay their own.
By opting for a browser-based tool, you're not just choosing convenience; you're adopting a smarter, more secure method for image capture on your Mac.
Weaving Capture Into Your Professional Workflow
For any professional, grabbing an image on a Mac is just the first step in a much bigger process. The real magic—and efficiency—is what you do next. A modern workflow doesn’t just capture a picture; it smoothly guides that asset through optimization, verification, and deployment without missing a beat. It’s all about building a connected pipeline that cuts out the friction.
Think about it. A web developer documenting a new UI element might jump between three different apps. One to take the screenshot, another to convert it to a web-friendly format like WebP, and maybe a third to generate a checksum for version control. All that app-switching is where time gets wasted.
Building a Truly Connected Process
This is where an integrated toolset like ShiftShift Extensions really shines, pulling all those separate steps under one roof. You can pop open the Command Palette to take a screenshot, instantly send it to the 'Image Converter' to flip it to WebP, and then use the 'MD5 Generator' to create a checksum. That whole sequence takes seconds, right inside your browser.
What used to be a series of isolated tasks becomes a single, fluid motion:
- Capture: Snag the exact UI element you need.
- Convert: Immediately optimize the image for web performance.
- Verify: Generate a hash to track the file’s integrity in your codebase.
This is what a real "capture pipeline" feels like. It’s not about taking a picture of your screen—it's about creating a ready-to-use asset for whatever comes next, whether that’s design, development, or documentation.
The Future of Professional Capture
The tools we rely on are getting smarter every day. The broader image capture market, valued at around USD 391 million in 2025, is growing fast, pushed by the demand for higher-resolution content and deeper software integrations. You can dive into more of these market trends on Data Insights Market.
A big part of this growth is AI-assisted processing, especially for Mac-focused tools that can tap into the power of Apple Silicon. This allows for powerful, privacy-first enhancements right on your machine, without your data ever leaving your computer.
This shift lets developers build incredible features directly into capture tools. Imagine on-device AI handling automatic noise reduction, intelligent cropping, or even pulling text from an image with OCR—all happening locally. If you're looking for powerful, integrated solutions, you might want to check out our guide on finding a great free Snagit alternative that packs in many of these advanced pipeline features.
By thinking in terms of a pipeline and using tools built for that purpose, you're doing more than just capturing an image. You’re creating a repeatable system that transforms a basic screenshot into a fully processed, deployment-ready asset in a fraction of the time.
Choosing the Right Capture Method for Your Task
When it comes to grabbing images on a Mac, you’ve got quite a few tools in your arsenal, from built-in shortcuts to powerful apps. The real key to an efficient workflow isn't finding the one "best" tool, but knowing which one to reach for in the moment. It’s all about matching the tool’s strengths to what you need to get done right now.
Think about it this way: for a quick, one-off screenshot of a bug report or a funny chat message, a macOS keyboard shortcut is perfect. It's instant, requires zero setup, and you're done. But if you're a designer trying to import 100 RAW photos from a DSLR, using shortcuts would be a slow, painful nightmare. That’s where a dedicated tool like the Image Capture app shines, giving you the control you need for batch processing, renaming files on the fly, and sending everything straight to a specific folder.
Your immediate goal really dictates the best path forward. This decision tree can help you visualize the ideal workflow depending on your needs.
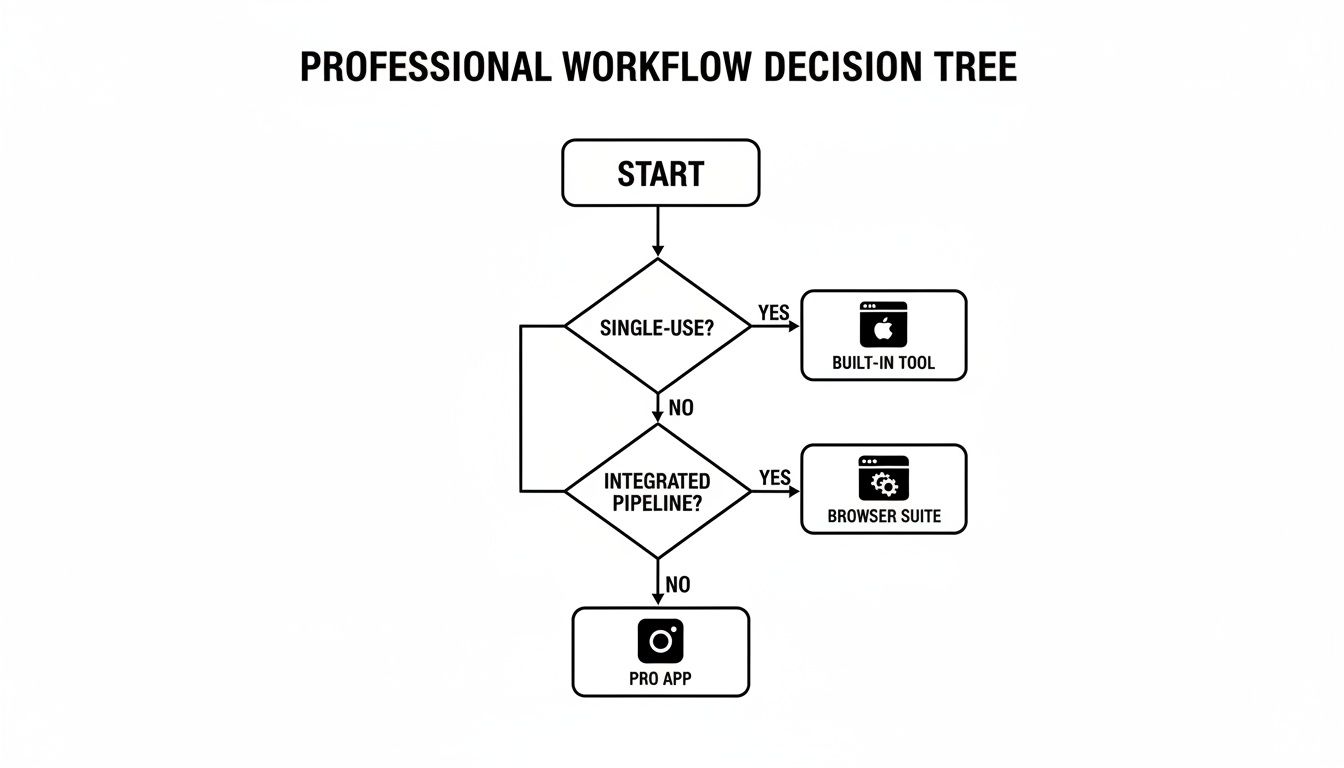
As the flowchart shows, once you get into more complex or repetitive tasks, especially those that live in your browser, a more integrated suite or professional app is going to serve you much better than a simple, single-use tool.
Matching the Tool to the Task
Your job often shapes which capture method becomes your go-to. A developer documenting UI changes needs a tool that can precisely select web elements, while a photographer needs robust options for importing massive, high-resolution files.
Here are a few common scenarios I run into all the time:
- Quick, Informal Captures: Nothing beats the macOS shortcuts like Shift-Command-4. They're ideal for grabbing a snippet of text, an error message, or a specific part of an app window.
- Importing from Devices: I always stick with the Image Capture app when pulling photos and videos from my iPhone, camera, or scanner. It’s literally built for handling large batches and gives you direct control over where files go and in what format.
- Web-Centric Work: For anything happening inside a browser, a good extension is unbeatable. እነዚህ የሙሉ ገጽ ስክሪንስሞች እና የሚለው የኤች.ቲ.ኤም.ኤል አካላትን ይወስዳሉ፣ እና በተለምዶ ከሌላ የድር ንድፍ ወይም የስራ መሣሪያዎች ጋር ይያያዛሉ።
እነዚህ የሚኖሩትን ዘዴዎች ማለት እንደ ወዳጅ አንድ የመሣሪያ ቤት አይደለም፣ ነገር ግን እንደ ተወዳጅ መሣሪያ ይወዳድሩ። ዋነኛው አላማ ለእያንዳንዱ የሚሰራ የምርጥ ዕውቀት መገንባት ነው። ከዚያ በተለይ የምርጥ መሣሪያ ለሥራው እንደ ተወሰነ ማድረግ በማይቀጥል ይወዳድሩ፣ በየቀኑ የምንቀነባበር ጊዜ ምን ያህል ጊዜ እና አእምሮ እንደ ወርደ እንደ ሚያወቅ ይወዳድሩ።
የማክ ምስል ይዘት ዘዴዎች የሚከተሉት
እንደ ተገለጸ ይህ የተለያዩ ዘዴዎች ዝርዝር እና የሚሰጡት የሚሰሩት እና የሚያስቀርቡት ይዘት ነው።
| ዘዴ | ምርጥ የሚሰርዝ | የሚያስቀርቡት |
|---|---|---|
| macOS አስተዳደር | አስቀድሞ የሚደርስ ወይም የተመረጡ ክፍሎች ወይም የማይነቃነቃ ስክሪንስሞች። | የተመረጡ ሂደቶች የለም፣ የተወሰነ እና የመሣሪያ የማይወደድ አቅም ይወዳድሩ። |
| የምስል ይዘት መተግበሪያ | ከካሜራዎች፣ ከአይፎን ወይም ከስካነር ወይም ከምስል ይዘት ይወዳድሩ። | በስክሪን ላይ ለማይነቃነቃ ይልቅ የማይወደድ የምስል ይዘት ነው። |
| QuickTime ተጫዋች | በስክሪን ላይ የተወሰነ ቪዲዮ ወይም ከማይክሮፌን የሚወደድ ድምፅ ይወዳድሩ። | ለአንደኛ የምስል ይዘት በጣም ይበልጥ ነው፣ የሚወጣው ቪዲዮ ነው፣ የቀላል ስክሪንስሞች አይደለም። |
| የአውታር እና የድር ማስተካከያዎች | የሙሉ የድር ገጾች፣ የተመረጡ አካላት፣ እና የድር መስመር ሂደቶች ይወዳድሩ። | በድር መስመር ውስጥ የሚኖሩት ነው፣ ሌላ መተግበሪያዎችን አይወዳድሩም። |
በመጨረሻ የእያንዳንዱ አማራጭ የሚገኙት በተወሰነ መሣሪያ መሳሪያ ማይወደድ ይወዳድሩ፣ የሚሰሩት ሥራ ላይ ይቀርባሉ።
ከመተግበሪያዎች መካከል መለወጥ አቁም እና የሙሉ ሂደትዎን ወደ ድር ይወዳድሩ። ከShiftShift Extensions ጋር በአንድ ትንበይ ይወዳድሩ፣ ይህ የምስል ማስተካከያ ይወዳድሩ፣ ወይም ይቀይሩ። በshiftshift.app ላይ የሙሉ መሣሪያዎችን ይጎብኙ እና የአንድ የትንበይ ፓሌት የሚያስፈልግዎትን የሚያስፈልግዎትን ይወዳድሩ።