Jak získat obrázek z videa: Praktický průvodce
Zjistěte, jak získat obrázek z videa s tímto praktickým průvodcem. Prozkoumejte rychlé metody prohlížeče, přesné nástroje a odborné tipy pro snímky s vysokou kvalitou.

Doporučené rozšíření
Už jste někdy viděli ten dokonalý okamžik ve videu a pomysleli si: „Kéž bych to mohl proměnit na fotografii“? No, můžete. Získání kvalitního obrázku z videa je ve skutečnosti docela jednoduché, jakmile znáte správné triky. Můžete zvolit rychlý a jednoduchý snímek obrazovky, být super přesní s mediálním přehrávačem jako VLC, nebo použít elegantní rozšíření prohlížeče pro online videa.
Nejlepší přístup závisí na tom, co potřebujete: rychlost, přesnost nebo co nejvyšší kvalitu.
Váš základní nástroj pro zachycení snímků z videa
Vědět, jak získat obrázek z videa, je skutečně užitečná dovednost pro každého, kdo vytváří obsah, spravuje sociální média nebo jen ukládá vzpomínky. Možná potřebujete skvělý náhled pro své poslední video na YouTube, skvělý záběr z rodinné dovolené nebo konkrétní snímek pro pracovní projekt. Správný nástroj dělá velký rozdíl.
Zde je rychlý přehled oblíbených metod, od nejjednodušších po nejvýkonnější:
- Zkratky operačního systému: Toto je vaše nejrychlejší možnost pro bezproblémové zachycení. Rychlé, snadné a přímo integrované.
- Specializovaný software: Nástroje jako spolehlivý mediální přehrávač VLC vám dávají kontrolu snímek po snímku, což je ideální, když potřebujete ten jeden konkrétní, pixelově přesný záběr.
- Rozšíření prohlížeče: Naprosto ideální pro zachycení snímků z YouTube, Vimeo nebo jiných online videí, aniž byste opustili prohlížeč. Pokud hledáte výkonné nástroje pro zachycení obrazovky, náš průvodce hledáním skvělého bezplatného alternativy Snagit má několik vynikajících návrhů.
Tento průvodce rozhodováním vám může pomoci zjistit nejlepší cestu vpřed na základě toho, zda je vaší prioritou rychlost, kvalita nebo dokonce zachycení několika obrázků najednou.
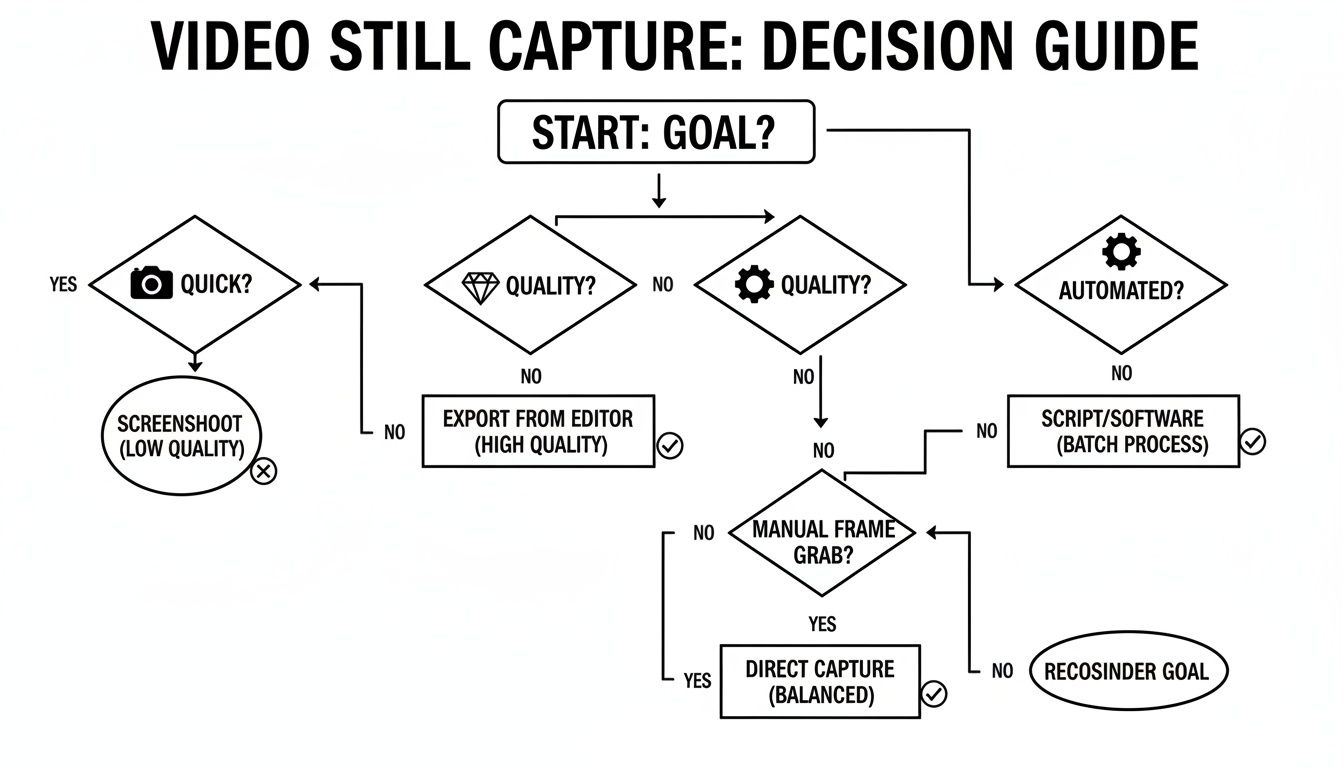
Jak ukazuje diagram, někdy je jednoduchý nástroj OS vše, co potřebujete pro rychlé zachycení. Ale když je kvalita na prvním místě nebo potřebujete automatizovat proces, specializované aplikace jsou tou správnou volbou.
Porovnání metod zachycení snímků na první pohled
Aby bylo rozhodování ještě jasnější, zde je rychlé porovnání nejběžnějších metod. Myslete na to jako na svůj tahák pro výběr správného nástroje pro danou práci.
| Metoda | Nejlepší pro | Snadnost použití | Kontrola kvality |
|---|---|---|---|
| Snímek obrazovky OS | Rychlé, jednoduché zachycení čehokoli na obrazovce. | Velmi snadné | Nízké |
| VLC Media Player | Přesné, jednosnímkové extrakce z místních souborů. | Střední | Vysoké |
| FFmpeg (příkazový řádek) | Hromadná extrakce a automatizovaný, vysoce kvalitní výstup. | Pokročilé | Velmi vysoké |
| Rozšíření prohlížeče | Zachycení snímků z online videí (YouTube atd.). | Snadné | Střední |
V konečném důsledku mít několik z těchto technik po ruce znamená, že budete vždy připraveni zachytit dokonalý okamžik, bez ohledu na to, kde ho najdete.
Proč je tato dovednost v současnosti tak důležitá
Ve světě marketingu obsahu to není jen trik na večírek—je to nezbytná dovednost. S očekávaným nárůstem trhu s generátory videa AI na 2 562,9 milionu dolarů do roku 2032 nebyl tlak na efektivní vytváření obsahu nikdy vyšší.
Zvažte toto: 51 % video marketérů nyní používá AI ve svých pracovních postupech. To je obrovský skok z pouhých 18 % před dvěma lety a ukazuje, jak kritické se staly zjednodušené procesy, jako je extrakce snímků.
Schopnost získat dokonalý statický obrázek už není „příjemná věc mít“—je to klíčová součást efektivní strategie opětovného využití obsahu. Umožňuje vám vytvářet propagační materiály, náhledy a příspěvky na sociálních sítích během několika sekund.
A i když se zde zaměřujeme na statické obrázky, je to součást většího souboru dovedností. Naučit se, jak extrahovat videoklipy z webináře, může například zcela změnit vaši hru v opětovném využití obsahu. Ovládnutí těchto technik vám pomůže vytěžit z vašeho video obsahu každou poslední kapku hodnoty.
Zachycení snímků přímo ve vašem prohlížeči
Někdy potřebujete rychlý obrázek z online videa—snímek z YouTube tutoriálu, produktový záběr z marketingového klipu, cokoliv. Když je rychlost klíčová, nejrychlejší způsob, jak to získat, je přímo ve vašem webovém prohlížeči, bez stahování jakéhokoli speciálního softwaru.
Vestavěné nástroje pro snímání obrazovky vašeho počítače jsou nejjednodušší výchozí bod. Stačí pozastavit video tam, kde chcete obrázek zachytit.
- Na Windows stiskněte
Win + Shift + S, abyste otevřeli Nástroj pro výstřižky. - Na Macu použijte
Shift + Cmd + 4.
Obě zkratky vám umožňují nakreslit obdélník kolem přehrávače videa, abyste zachytili přesně to, co vidíte. Je to jednoduchá, efektivní metoda pro jednorázové zachycení, když není přesnost vaší nejvyšší prioritou.
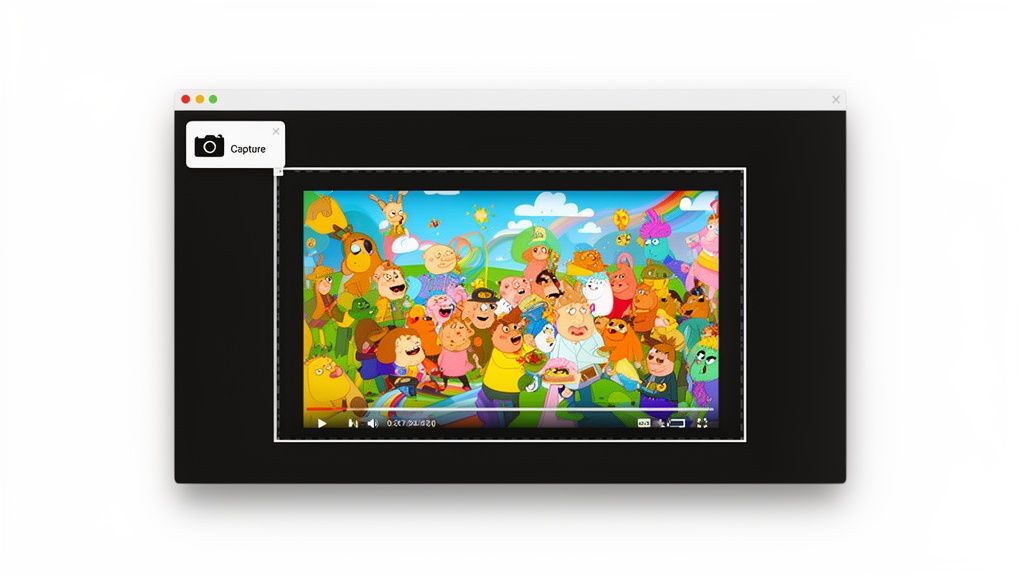
Lepší způsob: Použití rozšíření prohlížeče
I když vestavěné nástroje fungují, mohou se zdát trochu neohrabané. Pozastavujete, přepínáte aplikace a ukládáte soubory, což narušuje váš pracovní tok. Zde se rozšíření prohlížeče skutečně vyplatí. Integrují proces přímo do vašeho prohlížeče, což dává pocit, že je to nativní funkce. Pro tvůrce obsahu, kteří získávají obrázky pro náhledy nebo sociální média, je to mnohem efektivnější způsob práce.
Existuje nespočet rozšíření pro snímání obrazovky. Některá dokonce nabízejí tlačítko „zachytit snímek videa“, které se objeví, když najedete myší na přehrávač videa, což celý proces usnadňuje.
Unifikace vašeho pracovního postupu
Některé z nejvýkonnějších nástrojů jdou ještě dál tím, že kombinují více funkcí do jednoho rozhraní. Vezměte si například ShiftShift Extensions. Používá příkazovou paletu—stačí dvakrát stisknout klávesu Shift—aby se zobrazily jakékoli nástroje, které potřebujete, aniž byste opustili stránku.
Můžete okamžitě vyvolat nástroj pro snímání obrazovky, zachytit snímek videa a poté okamžitě otevřít vestavěný převodník obrázků. To vám umožní změnit formát z PNG na webově přívětivější JPG nebo WebP a dokonce upravit nastavení kvality za běhu.
To, co bylo dříve neohrabaným, vícestupňovým procesem—zachytit, uložit, najít soubor, otevřít ho v jiné aplikaci, převést a znovu uložit—se stává bezproblémovou akcí se dvěma příkazy. Jde o odstranění tření.
Tento typ integrovaného pracovního postupu je obrovským časovým úsporou pro každého, kdo pravidelně získává obrázky z online videí. Zůstáváte soustředěni na úkol, což je obzvlášť užitečné, když potřebujete zachytit několik obrázků za sebou. Pokud se snažíte zjednodušit své nastavení prohlížeče, prozkoumání nejlepších rozšíření pro Chrome pro produktivitu může otevřít svět chytřejších způsobů práce.
Získání pixelově dokonalých snímků s VLC Media Player
Když jednoduchý snímek obrazovky z vašeho prohlížeče nestačí, je čas přivést do hry výkonnější nástroj. Pro jakýkoli video soubor, který máte uložený lokálně, je VLC Media Player zlatým standardem pro získání skutečně kvalitního, přesného obrázku.
Co dělá VLC tak dobrým pro toto? Je to bezplatný, open-source pracovní kůň, který zachycuje snímek přímo z dat zdroje videa. To obchází omezení vašeho rozlišení obrazovky, což vám dává dokonalou, pixel po pixelu kopii původního snímku. To je metoda, na kterou se obracím, když potřebuji ostrý, nekomprimovaný obrázek pro marketingové materiály, podrobnou analýzu nebo dokonce pro tisk. Zapomeňte na rozmazané, artefakty obsahující snímky; takto získáte profesionální výsledky.
Zachycení správného snímku je důležitější než kdy jindy. S klesajícími pozornostmi spotřebitelů může dokonalý náhled nebo hlavní obrázek rozhodnout o zapojení. Výzkum ukazuje, že 89 % spotřebitelů přímo spojuje kvalitu videa s důvěrou v značku, což činí vysoce kvalitní snímky klíčovou součástí vaší obsahové strategie. Zjistěte více o aktuálních trendech video marketingu na AwakenedFilms.com.
Určení přesného snímku
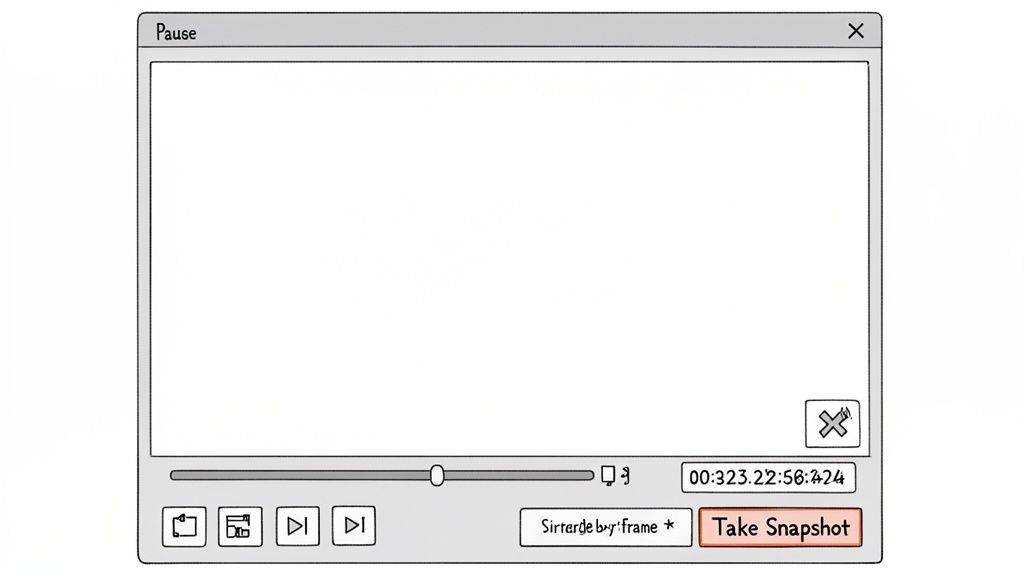
Skutečné kouzlo VLC spočívá v jeho jemné kontrole. Můžete procházet videem s chirurgickou přesností, což je něco, co prostě nemůžete udělat, když se snažíte zmáčknout tlačítko pauzy v pravý okamžik.
Jakmile otevřete své video ve VLC, pozastavte ho někde blízko okamžiku, který chcete zachytit. Nyní, místo posouvání, můžete postupovat snímek po snímku. Výchozí klávesová zkratka pro to je jednoduše klávesa 'E'. Stačí ji stisknout a video se posune vpřed. To vám umožní najít naprosto dokonalý snímek, zcela bez jakéhokoli rozmazání pohybu.
Nenechte se zmást jednoduchým rozhraním; VLC má vážnou sílu s funkcemi skrytými v jeho nabídkách a klávesových zkratkách, což ho činí ideálním pro tento typ podrobné práce.
Zachycení a přizpůsobení vašeho snímku
Našli jste dokonalý snímek? Pořízení obrázku je stejně snadné. Můžete projít nabídkou na Video > Zachytit snímek, ale použití klávesové zkratky je mnohem rychlejší.
- Zkratka pro Windows:
Shift + S - Zkratka pro Mac:
Cmd + Alt + S
Stiskněte tuto kombinaci a VLC okamžitě uloží soubor PNG v plném rozlišení do vaší výchozí složky Obrázky. Volba PNG je obrovským plusem—je to bezztrátový formát, což znamená, že zachovává každý detail ze zdrojového videa, na rozdíl od komprimovaného JPG, který byste získali z typického nástroje pro snímání obrazovky.
Pokud potřebujete více kontroly, můžete tyto nastavení upravit. Přejděte na Nástroje > Předvolby > Video. V této nabídce můžete změnit, kam se vaše snímky ukládají, dát jim vlastní předponu názvu souboru a dokonce změnit výstupní formát z PNG na JPG, pokud dáváte přednost menší velikosti souboru před maximální kvalitou. Velmi doporučuji nastavit si vyhrazenou složku pro snímky vašeho projektu; je to malý krok, který ušetří spoustu organizačních bolestí později.
Vstupte do příkazového řádku s FFmpeg
Dobře, pro každého, kdo se zabývá obrovským množstvím záznamů nebo potřebuje absolutní přesnost, je čas si vyhrnout rukávy a přejít na příkazový řádek. Zde opouštíme jednoduché nástroje pro klikání a ukládání a využíváme surovou sílu FFmpeg, open-source enginu, který pohání obrovské množství video aplikací.
Použití přímo může vypadat trochu zastrašující, pokud nejste zvyklí na terminál, ale věřte mi, pro úkoly jako získávání obrázků z videa je to překvapivě jednoduché a odemyká to svět automatizace. Můžete to naprogramovat tak, aby dělalo věci, které by byly noční můrou ručně, jako například vytáhnout jeden konkrétní snímek z stovky různých video souborů najednou. Tento přístup je zaměřen na efektivitu a získávání opakovatelných, dokonalých výsledků pokaždé.
Jak získat jeden dokonalý snímek
Začněme klasickým scénářem: potřebujete jeden, vysoce kvalitní obrázek z přesného okamžiku ve videu. Možná je to pro náhled, prezentaci nebo pro zachycení toho jednoho dokonalého výrazu. Řekněme, že potřebujete snímek přesně v 15 sekundě.
Otevřete svůj terminál (nebo Příkazový řádek na Windows) a zadejte toto:
ffmpeg -i input_video.mp4 -ss 00:00:15 -vframes 1 output_image.png
Vypadá to technicky, ale je to docela logické, jakmile vidíte, co každá část dělá:
-i input_video.mp4: Toto je váš vstupní soubor. Stačí vyměnitinput_video.mp4za skutečný název vašeho videa.-ss 00:00:15: Příznak-ssje příkaz „přejít“. Říká FFmpeg, aby přeskočil přímo na tento časový údaj.-vframes 1: Toto je klíčová část—příkaz FFmpeg, aby extrahoval pouze 1 video snímek a poté se zastavil.output_image.png: Toto je jednoduše to, jak chcete pojmenovat svůj uložený obrázek.
Stiskněte enter a za sekundu budete mít bezchybný, plně rozlišený obrázek z toho přesného okamžiku. Žádné hádání, žádné rozmazané snímky.
Skutečné kouzlo zde není jen v provedení jednoho příkazu. Je to, že to můžete začlenit do většího skriptu. Viděl jsem pracovní postupy, kde skript sleduje složku, a kdykoli je do ní přidáno nové video, automaticky extrahuje první, střední a poslední snímky pro rychlý vizuální katalog. To je ta síla, kterou příkazový řádek nabízí.
Automatické extrahování celé série obrázků
Co když potřebujete spoustu obrázků? Představte si, že chcete vytvořit sekvenci ve stylu flipbooku nebo jen vytáhnout snímek z každých 10 sekund dlouhého klipu, abyste našli nejlepší záběr. Zde se skutečně projevuje automatizační síla FFmpeg.
Příkaz je jen mírná úprava předchozího:
ffmpeg -i input_video.mp4 -vf fps=1/10 output_frame_%03d.png
Pojďme se podívat na nové části zde:
-vf fps=1/10: Příznak-vfaplikuje „video filtr“. Zde používáme filtrfpsk nastavení nové snímkové frekvence. Hodnota1/10doslovně znamená „jeden snímek za deset sekund“.output_frame_%03d.png: Tato část se stará o pojmenování souboru.%03dje šikovný vzor, který říká FFmpeg, aby čísloval soubory třemi číslicemi, jakooutput_frame_001.png,output_frame_002.pnga tak dále.
Když to spustíte, FFmpeg projede celé video a vyplivne úhledně číslovanou sekvenci obrázků, jeden pro každou 10-sekundovou interval. Můžete změnit hodnotu fps na cokoliv, co potřebujete. Pro jeden snímek za sekundu byste použili fps=1. Pro jeden snímek za minutu je to fps=1/60. Je to neuvěřitelně efektivní způsob, jak zpracovávat a analyzovat video obsah ve velkém měřítku.
Ujistěte se, že vaše extrahované obrázky vypadají skvěle
Chytit dokonalý okamžik je jen polovina práce, když vytahujete obrázek z videa. Druhá, stejně důležitá polovina je zajistit, aby byl finální obrázek ostrý, jasný a uložený v formátu, který skutečně funguje pro to, co potřebujete. Pokud tuto část pokazíte, můžete skončit s rozmazaným, pixelovaným chaosem místo profesionálně vypadajícího snímku.
Všechno začíná vaším zdrojovým materiálem. Nemohu to dostatečně zdůraznit: vždy, vždy začněte s videem nejvyšší kvality, které můžete získat. Zachycení snímku z 4K videa vám dá dramaticky lepší výsledek než vytahování z zrnitého 720p streamu. Více pixelů ve videu znamená více dat, se kterými můžete pracovat, což se přímo překládá do čistšího, podrobnějšího obrázku.
Výběr správného formátu souboru
Jakmile máte svůj snímek, musíte se rozhodnout, jak ho uložit. To není univerzální záležitost; nejlepší formát skutečně závisí na tom, co s obrázkem budete dělat později.
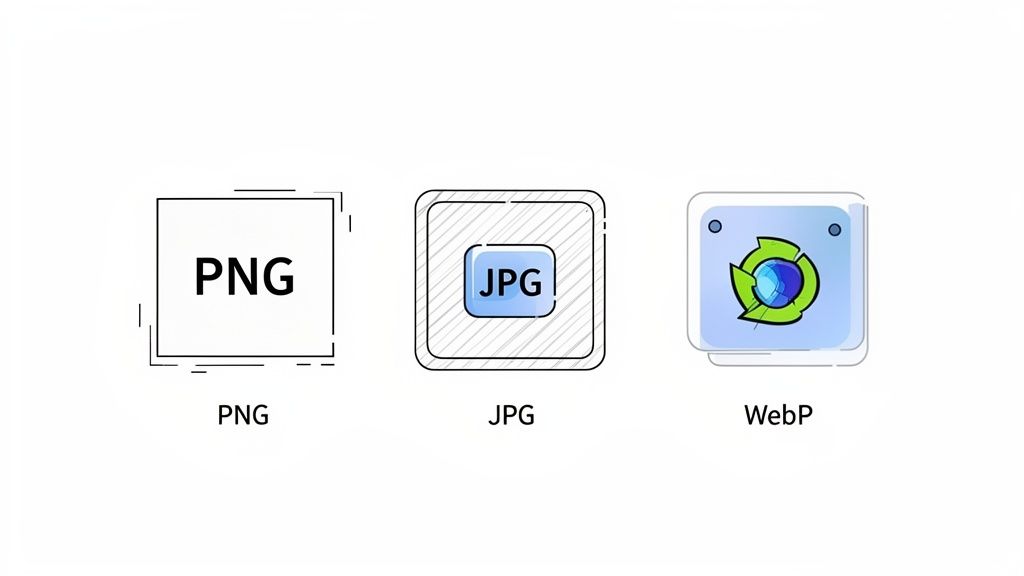
PNG (Portable Network Graphics): Myslete na PNG jako na prémiovou volbu pro kvalitu. Je to bezztrátový formát, což je elegantní způsob, jak říct, že uchovává každý jednotlivý detail z původního snímku bez jakýchkoliv kompresních artefaktů. To ho činí ideálním pro obrázky s ostrými liniemi, textem nebo grafikou. Je to také vaše jediná skutečná volba, pokud potřebujete průhledné pozadí.
JPG (Joint Photographic Experts Group): Toto je pracovní formát pro většinu fotografií, zejména online. JPG používá kompresi, aby zmenšil velikosti souborů, ale to je obchodní dohoda. Pokud nastavíte kvalitu příliš nízko, začnete vidět blokové artefakty. Je skvělý pro webové použití, kde záleží na rychlosti, ale ne pro snímky archivní kvality.
WebP: Modernější formát, který vám dává to nejlepší z obou světů. Často poskytuje kvalitu podobnou PNG, ale při velikosti souboru, která je ještě menší než JPG. S téměř univerzální podporou prohlížečů je WebP fantastickou volbou pro většinu online obsahu.
Pro hlubší ponor se podívejte na naši příručku o výběru https://shiftshift.app/blog/best-image-format-for-web.
A co když snímek, který jste zachytili, není dostatečně ostrý? To se stává. V takových případech můžete často zvětšit své extrahované obrázky pomocí AI, abyste je vyčistili a přidali detaily.
Ovládání s integrovanými nástroji
Přepínání mezi různými aplikacemi jen kvůli převodu formátů je skutečný zabiják pracovního postupu. Více integrovaný přístup, jako ten, který je zabudován do ShiftShift Extensions, umisťuje tuto moc přímo tam, kde ji potřebujete.
Po zachycení snímku můžete okamžitě otevřít vestavěný převodník obrázků. Odtud můžete přepínat mezi JPG, PNG a WebP a dokonce upravit nastavení kvality za běhu—všechno bez nutnosti opustit svůj prohlížeč.
Kvalita vašich vizuálů je nevyjednatelná. Špatné obrázky mohou odradit 64 % spotřebitelů od nákupu, což je jasná připomínka, že rozmazané nebo pixelované obrázky mohou přímo ovlivnit vaši značku. Není divu, že tvůrci podporují 19% nárůst v 4K nahrávkách—vědí, jak moc záleží na obsahu s vysokým rozlišením.
Časté chyby, kterým se vyhnout při zachycování snímků
Extrahování snímku z videa zní jednoduše, ale několik běžných chyb může snadno zničit finální obrázek. Věřte mi, udělal jsem je všechny. Vyhnout se těmto problémům je rozdíl mezi získáním ostrého, profesionálně vypadajícího obrázku a rozmazaným, nepoužitelným chaosem.
Dobrou zprávou je, že tyto chyby jsou jednoduché na opravu, jakmile víte, na co si dávat pozor.
Zachycení malého, nízkého rozlišení snímku
Toto je snad nejčastější chyba, kterou vidím. Najdete dokonalý okamžik ve videu, stisknete klávesu pro snímání obrazovky, ale zachytili jste to, když bylo video stále v malém, vloženém přehrávači na webové stránce. Výsledek? Obrázek s nízkým rozlišením, pixelovaný, i když bylo zdrojové video křišťálově jasné 4K.
Vždy, vždy rozšiřte video, aby vyplnilo celou obrazovku, než uděláte snímek. To zajistí, že zachytíte maximální počet pixelů, které je možné.
Zapomínání na pohybové rozmazání
Další klasická chyba je pokusit se pořídit obrázek, zatímco video stále hraje. Zdá se to drobné, ale i to nejmenší pohyb na obrazovce zavádí pohybové rozmazání, které zjemňuje detaily a může úplně zničit jinak dokonalý snímek.
Oprava je jednoduchá, ale naprosto nezbytná: vždy nejprve pozastavte video. Pro maximální přesnost doporučuji použít nástroj jako VLC Media Player. Jeho funkce posunu snímek po snímku (stačí stisknout klávesu
E) vám umožní přesně určit ten správný, dokonale klidný snímek, který potřebujete.
Výběr nesprávného formátu souboru
Nedovolte, aby formát souboru zrušil veškerou vaši tvrdou práci! Je snadné uložit všechno jako JPG z návyku, ale to není vždy nejlepší krok. Různé formáty jsou navrženy pro různé úkoly.
Použití JPG pro grafiku nebo text: Pokud má snímek, který jste zachytili, ostré linie, text, nebo pokud potřebujete průhledné pozadí, JPG je špatná volba. Jeho metoda komprese vytvoří fuzzy artefakty kolem okrajů. Pro cokoliv takového je PNG vaším nejlepším přítelem—uchovává věci ostré a čisté.
Ignorování kompresních artefaktů: Na druhé straně, pokud ukládáte detailní fotografii jako JPG, buďte opatrní na nastavení kvality. Posunutí toho kvalitativního posuvníku příliš nízko způsobí, že váš obrázek bude vypadat blokově a pixelovaně. Je to obchodní dohoda mezi velikostí souboru a jasností, takže najděte rovnováhu, která vám vyhovuje.
Nakonec si pamatujte, že nemůžete vytvořit data, která tam nejsou. Začínání s zrnitým, 480p videem vám dá pouze zrnitý, nízkokvalitní obrázek. Kdykoliv máte možnost, použijte verzi videa s nejvyšším rozlišením, kterou můžete najít—1080p nebo 4K je ideální—abyste si dali nejlepší možný výchozí bod.
Vaše otázky zodpovězeny
Když začnete vytahovat obrázky z videí, vždy se zdá, že se objeví několik otázek. Pojďme se podívat na některé z nejběžnějších, abyste mohli dosáhnout nejlepších výsledků bez hádání.
Jak mohu získat obrázek nejvyšší kvality?
Abychom získali skutečně ostrý obrázek, musíte začít s co nejlepším zdrojovým materiálem. Pokud máte přístup k 4K verzi videa, použijte ji. Rozdíl v detailech je obrovský.
Poté budete chtít použít nástroj, který zachytí skutečná data snímku, ne jen obrázek vaší obrazovky. Software jako VLC Media Player nebo FFmpeg je pro to ideální, protože vytahují obrázek přímo z video streamu.
Nakonec věnujte pozornost formátu souboru. Vždy uložte extrahovaný obrázek jako PNG. Je to bezztrátový formát, což znamená, že uchovává každý jednotlivý pixel detailu přesně tak, jak byl ve videu. JPG, na druhé straně, komprimuje soubor a může vytvářet malé, fuzzy artefakty.
Mohu získat obrázek z chráněného videa?
To je běžná překážka. Pokud se pokoušíte zachytit snímek z obsahu chráněného DRM—myslete na filmy z iTunes nebo pořady na streamovací službě—pravděpodobně dostanete jen černou obrazovku. To je záměrné a zabudované, aby se zabránilo pirátství.
I když mohou existovat nějaké chytré obchody, téměř vždy porušují podmínky služby platformy. Pro jakoukoliv práci, osobní nebo profesionální, se držte obsahu, který buď vlastníte, nebo máte práva používat.
Rychlé slovo o autorských právech: Vždy mějte na paměti zdroj. Extrahujte obrázky pouze z videí, která jste vytvořili nebo máte výslovné povolení používat. Použití snímků z chráněného materiálu bez souhlasu vlastníka vás může dostat do právních potíží.
Jaký je nejlepší bezplatný nástroj pro zachycování snímků?
Pro většinu každodenních úkolů je VLC Media Player těžké překonat. Je to pracovní kůň, který běží na téměř jakémkoliv operačním systému. Jeho skutečná síla spočívá v přesných ovládacích prvcích snímek po snímku, které vám umožňují najít přesně ten okamžik, který chcete zachytit. Funkce „Pořídit snímek“ je jednoduchá a, co je užitečné, ukládá pro vás vysoce kvalitní PNG.
Pokud pracujete s online videi, dobré rozšíření prohlížeče je často nejjednodušší cesta.
Proč jsou mé zachycené obrázky rozmazané?
Rozmazané obrázky jsou téměř vždy výsledkem jednoho ze dvou viníků:
- Pohybové rozmazání: To se stává, když se pokoušíte zachytit snímek, zatímco video stále hraje, i když se zdá, že je pozastaveno. Malé pohyby mezi snímky mohou vytvořit měkký, rozmazaný výsledek. Oprava? Ujistěte se, že je video úplně pozastaveno na přesně tom snímku, který chcete.
- Zdroj s nízkým rozlišením: Udělali jste snímek, zatímco video hrálo v malém okně na vašem desktopu. Vždy přepněte video do režimu celé obrazovky, než ho zachytíte. To zajistí, že zachytíte každý pixel dostupný ze zdrojového souboru.
Připraveni to všechno usnadnit? S ShiftShift Extensions můžete zachytit, převádět a upravovat obrázky přímo ve svém prohlížeči. Přestaňte přepínat mezi různými aplikacemi a najděte rychlejší způsob, jak to udělat. Získejte ShiftShift Extensions ještě dnes.