How to Screenshot a Web Page Like a Pro
Learn how to screenshot a web page with expert methods. This guide covers everything from native OS tools to advanced full-page captures for perfect results.
Recommended Extensions
Need to grab a quick snapshot of something on your screen? It’s pretty simple. On Windows, just hit Windows+Shift+S, and on a Mac, use Cmd+Shift+4. That lets you drag a box around what you want to capture. But for those long, scrolling pages, you'll need something a little more powerful, like a browser extension or the built-in developer tools.
Why Getting Good at Screenshots is a Game-Changer
Knowing how to properly screenshot a web page is more than just a neat trick; it's a vital skill for anyone who communicates online. A clear screenshot can show someone exactly what you're seeing, cutting through confusion and making your point instantly. It’s often the difference between a vague email and a piece of feedback that gets results.
Think about how often this comes up in day-to-day work. Developers and QA testers live by screenshots to report bugs with undeniable visual proof, which speeds up the entire fixing process. Designers pass them back and forth to give pinpoint feedback on layouts, highlighting a misaligned button or a color that's just a little off. For marketers, it's an easy way to save a competitor's ad or grab an example of great web design for the swipe file.
The data backs this up. A huge 80% of bug reports now come with screenshots, which helps slash resolution times by a remarkable 40%. The explosion of remote work has only made these tools more critical, driving up demand by over 30% as teams find new ways to collaborate visually. If you're curious, you can dig deeper into the website screenshot software market to see just how big this trend has become.
The Power of Having Everything in One Place
While the basic OS shortcuts are handy for a quick grab, they have their limits. Try to capture a long, scrolling sales page or add notes to an image, and you’ll find yourself looking for something better. This is where integrated toolkits really shine.
Tools like ShiftShift Extensions bring all your screenshot needs into one smooth workflow. Forget about juggling different apps or memorizing a bunch of keyboard commands. You can capture the visible part of a page, select a custom area, or grab a full scrolling page, all from a single command palette.
The real goal here is to make grabbing visual information as second nature as typing. When the tool is built right into your browser, you get rid of all the extra steps and can stay focused on what you're actually doing—whether that’s reporting an issue or just saving something that inspires you.
This all-in-one approach offers some real, practical benefits:
- It's fast. Hitting a quick keyboard shortcut like Cmd+Shift+P is always going to be quicker than hunting down a separate app.
- It's flexible. One tool can handle everything from a tiny icon to an entire webpage, adapting to whatever you need in the moment.
- It's private. Because the processing happens locally, your captures aren't sent to some random server, keeping your sensitive information safe on your own machine.
Ultimately, mastering the art of the screenshot is about making your communication clearer and your workflow faster. For anyone who works and collaborates online, it’s no longer a nice-to-have—it’s a core skill.
Using Your Built-In Screenshot Tools
Before you start hunting for new software, it's a good idea to get comfortable with the powerful screenshot tools already baked into your computer. Most operating systems come with native features that are more than capable of handling quick captures, letting you grab exactly what you see without any extra fuss.
On a Windows PC, the classic move is hitting the Print Screen (PrtScn) key. A single tap copies an image of your entire screen to the clipboard. From there, you can paste it into an email, a document, or an image editor. It’s quick and dirty, but not very precise.
Getting More Control on Windows
For more surgical captures, the modern solution is the Snipping Tool, which you can pop open instantly with the shortcut Windows Key + Shift + S. Your screen will dim, and a small toolbar will appear at the top, giving you a few ways to grab what you need.
- Rectangular Snip: The most common option. Just drag a box around the specific area you want to save.
- Freeform Snip: Get creative and draw any shape you like for a custom cutout.
- Window Snip: This is super useful. Click on any open application window to capture it perfectly, leaving out all the background clutter.
- Fullscreen Snip: Does exactly what it says—captures your entire screen, just like the old-school PrtScn key.
After you snip, the image goes straight to your clipboard. A small notification will also pop up; if you click it, you can make quick edits like cropping or highlighting. If you're a power user, there are even more Snipping Tool hacks to supercharge your screen captures that are worth exploring.
Quick Captures on macOS
Apple users have an equally slick set of built-in tools that are just a key combination away. The commands are intuitive and give you great control over what you're saving.
For a full-screen grab, just hit Command + Shift + 3. The magic here is that the screenshot saves instantly to your desktop as a new file—no extra steps needed.
If you only want a piece of the screen, Command + Shift + 4 is your go-to. This shortcut transforms your cursor into a set of crosshairs. Simply click and drag to select the exact area you need, and upon release, the image is saved right to your desktop.
Here's a pro-tip for Mac users: after pressing Command + Shift + 4, tap the spacebar. Your cursor will turn into a little camera icon. Now you can just click on any window to capture it perfectly, complete with a professional-looking drop shadow.
Browser-Based Screenshot Tools
Don't forget to check out the tools hiding right inside your web browser. Most modern browsers like Chrome, Firefox, and Edge have their own screenshot functions that are surprisingly powerful. You can usually find the option by right-clicking anywhere on a webpage.
These built-in browser tools often have a killer feature that system-level tools lack: the ability to capture an entire, scrolling webpage from top to bottom. While they might not pack all the bells and whistles of a dedicated tool, they're perfect for grabbing a quick snapshot without ever leaving your browser. For those times when you need even more editing power, our guide on a free Snagit alternative might point you in the right direction.
Capturing Full Scrolling Web Pages
The basic screenshot shortcuts are great for nabbing what’s right in front of you, but what happens when you need to capture everything below the fold? When the goal is to save a long article, archive a competitor’s entire landing page, or document a winding comment thread, a simple screen grab just doesn't measure up. This is where you need to know how to screenshot an entire web page, a task that quickly shows the limitations of most built-in tools.
While browsers like Chrome and Firefox offer native "full page" capture options, they often trip over the hurdles of modern web design. I've seen them struggle time and again with "sticky" navigation bars that stay put as you scroll, or with content that animates into view. The result? A final image with duplicated headers, missing chunks of content, or just plain weird visual glitches.
Why Native Tools Can Fail You
The root of the problem is how these basic tools "see" a page. They typically snap a series of static shots and then try to stitch them together, a method that completely ignores dynamic, moving parts of a website.
- Lazy-Loaded Content: To save bandwidth, many sites only load images and other elements as they scroll into view. A simple capture tool often scrolls too fast, leaving you with blank spots where rich content should be.
- Sticky Elements: Those fixed headers, footers, or sidebars? A basic tool can capture them in every single "slice," creating a messy, repetitive pattern down the length of your final screenshot.
- Infinite Scroll: Pages that just keep loading more content as you go, like social media feeds, are a nightmare for native tools. They simply don't have a clear signal on when to stop.
This is precisely where a specialized tool becomes a necessity. An extension like the Full Page Screenshot feature in ShiftShift Extensions is built from the ground up to handle these modern web challenges, giving you a pixel-perfect capture every time.
To figure out the best tool for the job, it helps to map out the decision process.
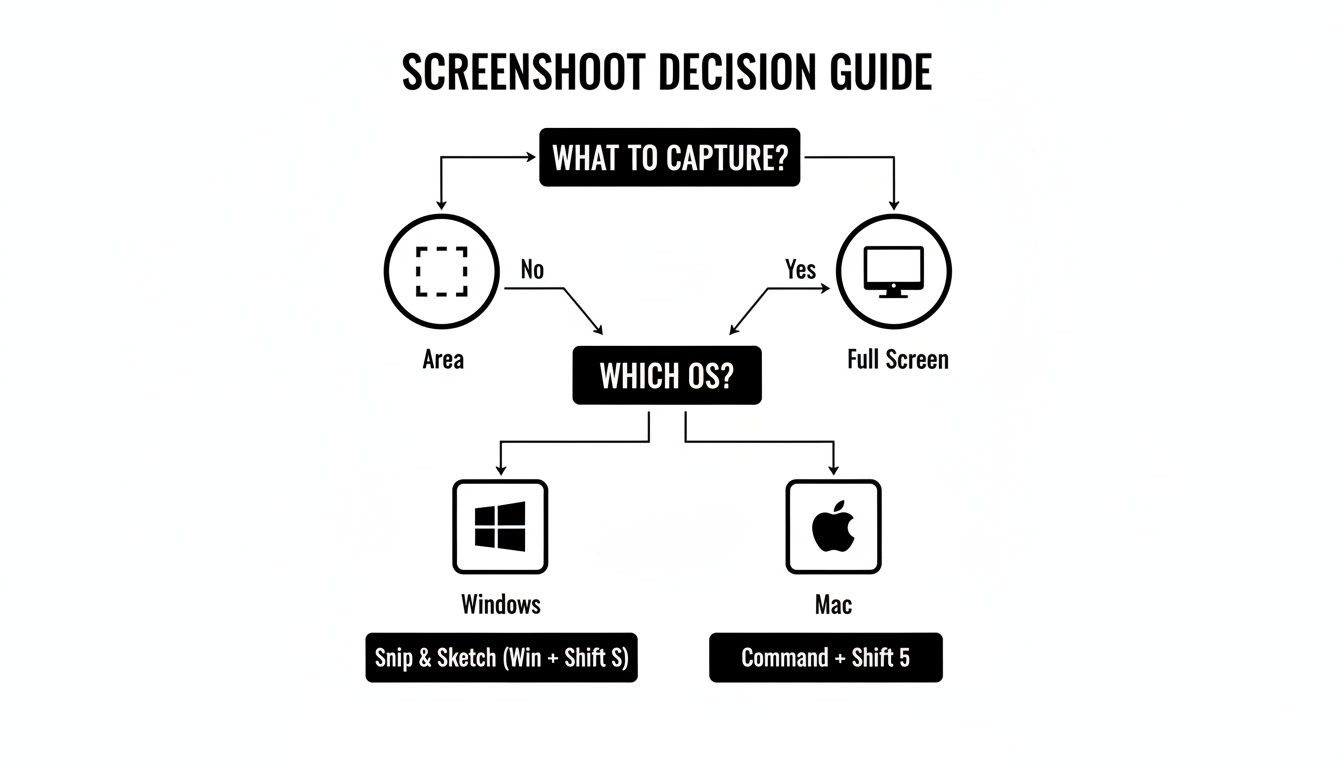
This flowchart cuts right to the chase, guiding you to the most efficient method based on what you need to capture and the operating system you're on.
The Specialized Tool Advantage
Choosing the right method for a full-page screenshot can make a huge difference in quality and accuracy. Here’s a quick comparison to help you decide.
Full Page Screenshot Method Comparison
| Method | Pros | Cons | Best For |
|---|---|---|---|
| Browser Built-in Tools | Free and already installed. | Often fails on pages with sticky elements, lazy loading, or infinite scroll. Can produce glitches. | Quick captures of simple, static web pages without complex layouts. |
| Operating System Scrolling Capture | No extra software needed on some OSes (like macOS). | Limited functionality and reliability; often has the same issues as browser tools. | Capturing content within native applications or very basic web pages. |
| Dedicated Browser Extensions | Intelligently handles complex pages, sticky elements, and lazy loading. Offers more features like annotation. | Requires installing a third-party extension. | Professionals needing reliable, high-quality captures of any web page, especially for design, QA, or documentation. |
Ultimately, for anyone who relies on screenshots for their work, a dedicated extension is the most dependable option.
The global market for website screenshot software shows just how critical this is, valued at an impressive USD 500 million in 2024 and projected to hit $1.2 billion by 2033. With over 6 billion internet users, the demand for tools that can reliably grab entire pages is massive. Developers and QA engineers, in particular, count on these tools to document bugs on complex sites with infinite scroll. For ShiftShift users, this means getting pro-level captures with a quick Command Palette double-Shift, with all the processing happening locally on your machine for complete privacy. You can find more details on the growing screenshot software market.
A dedicated full-page capture tool doesn't just take pictures; it intelligently renders the page. It scrolls at a controlled pace, waits for dynamic content to load, and correctly identifies and handles fixed elements to produce a single, seamless, and accurate image.
That intelligent approach is what sets these tools apart. Instead of just blindly stitching images together, a tool like ShiftShift's interacts with the page much like a real person would, ensuring the final file is an exact replica of the live page. This kind of reliability is non-negotiable for professional work, whether you're creating design mockups, archiving legal documents, or submitting a detailed bug report.
Unlocking Efficiency With Browser Extensions
While built-in tools get the job done for a quick grab here and there, they start to feel pretty clumsy when you're taking screenshots all day. If you find yourself constantly capturing web pages, a dedicated browser extension is your best bet. It plugs right into your workflow and genuinely saves time.
Forget about fumbling with different OS shortcuts or opening separate apps. A good extension puts powerful capture tools just a click away, turning a clunky, multi-step process into a single, fluid action.
The ShiftShift Extensions Advantage
The ShiftShift Extensions ecosystem is a perfect example of how this should work. It's not just another icon cluttering up your toolbar. Instead, it bundles a versatile screenshot tool with dozens of other utilities inside a single, clean command palette.
All you have to do is hit Cmd/Ctrl+Shift+P to pull up the screenshot function. This is a game-changer because you never have to break your flow or leave the task at hand.
You get all the essential capture modes right there:
- Visible Area: Snaps exactly what you see on your screen right now.
- Custom Selection: Lets you click and drag to grab just the specific part you need.
- Full Scrolling Page: The magic one. It automatically scrolls and stitches together an entire web page, from the header all the way down to the footer.
This kind of flexibility means you have one tool that handles just about any screenshot scenario you can think of. For more ideas on how integrated tools can boost your day, check out our list of the best Chrome extensions for productivity.
A Focus on Privacy and Simplicity
One of the biggest wins with the ShiftShift screenshot tool is its privacy-first design. Everything happens locally on your machine. Your screenshots are never uploaded to some random server, which means your sensitive information stays yours.
This local processing also has a nice side effect: the tool works perfectly offline. No internet connection needed. It’s a clean, reliable, and self-contained system that gives you real peace of mind.
The real power comes from consolidation. Having your screenshot tool live alongside converters, formatters, and other utilities in the same command palette means less context-switching and a more fluid, productive workflow. It's about making essential tools immediately available, not just accessible.
Expanding Your Screenshot Capabilities
Of course, the world of browser extensions is vast. Beyond an all-in-one ecosystem, you can find specialized tools built for developers, designers, or teams who need heavy annotation features. For instance, if you're deep into app store optimization, you might want to explore dedicated options like the one covered in this Awesome Screenshots Chrome Guide.
Ultimately, for anyone serious about web-based work, a high-quality browser extension is the definitive answer to taking better screenshots. It removes friction, adds powerful features, and respects your privacy—making it a must-have upgrade.
Pro Tips For Perfect Screenshots
Knowing the mechanics of how to grab a screenshot is one thing. But turning that raw image into something genuinely useful is a completely different skill. A basic screen capture is often just a jumble of visual noise. With a few quick edits, however, you can transform it into a powerful communication tool that makes your point instantly.
The first thing you’ll need to decide is the file format. This choice isn't just a technical detail; it has a real impact on your image's quality and file size.
Choose The Right File Format
Most of the time, you'll be choosing between PNG and JPEG. My rule of thumb is simple: PNG is for precision, and JPEG is for pictures.
PNG (Portable Network Graphics): For almost any screenshot of a website, app, or anything with text and sharp lines, PNG is the way to go. It uses lossless compression, meaning it doesn't discard any data to shrink the file. The result is perfectly crisp text and clean edges without any weird fuzziness.
JPEG (Joint Photographic Experts Group): Save this format for when your screenshot is dominated by a photograph. JPEGs are great at making photo files smaller, but their "lossy" compression method can create ugly artifacts and blurriness around text and user interface elements.
If you really want to get into the weeds, we have a whole guide on the best image format for the web that covers all the details.
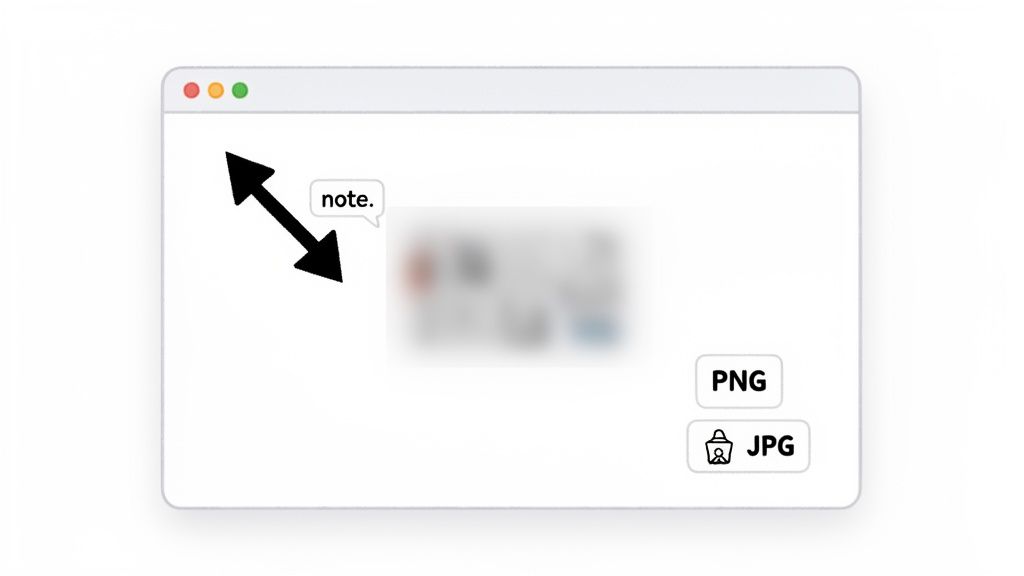
Annotate For Clarity And Privacy
A screenshot without any context is just a picture. By adding a few simple annotations, you can direct your audience's attention and protect sensitive information at the same time.
- Arrows and Shapes: Use an arrow, circle, or rectangle to point directly to the button that's broken or the design element you're talking about. It eliminates all guesswork.
- Text Notes: Sometimes, the image just can't tell the whole story. A short text note can add that missing piece of context.
- Blur Sensitive Data: This one is non-negotiable. Before you send a screenshot to anyone, always blur out personal information—names, email addresses, phone numbers, you name it. It's a fundamental step for protecting privacy.
These little additions make a world of difference. In a professional context, clear communication is everything. Research has shown that 70% of quality assurance professionals rely on screenshots as a primary tool for reporting bugs, which can cut down issue resolution time by as much as 35%. Tools like the ShiftShift Extensions make this dead simple by putting annotation features right at your fingertips.
A well-annotated screenshot respects the viewer's time. It answers questions before they're asked and directs focus immediately, ensuring your message is understood without any back-and-forth. This is the key to efficient visual communication.
Troubleshooting Common Screenshot Headaches
Even with the best tools at your disposal, you're bound to hit a few snags when capturing web pages. Let's walk through some of the most common frustrations I see and how to solve them so you can get the perfect shot every time.
How Can I Screenshot A Dropdown Menu That Keeps Closing?
This one is a classic. You try to capture a dropdown menu or a hover-activated tooltip, but it vanishes the second your cursor moves to take the shot. It feels like a frustrating game of whack-a-mole, but the fix is actually built right into your operating system.
The secret is using a timed delay. This feature gives you a few precious seconds to get everything in place before the screenshot is taken.
- On Windows: Pull up the Snipping Tool. Look for the little clock icon labeled "Delay" and pick a 3, 5, or 10-second timer.
- On macOS: The shortcut Cmd+Shift+5 brings up the screenshot panel. From there, click the "Options" menu and you'll see a 5- or 10-second timer.
Just start the timer, click to open your menu, and hold still. The tool will automatically capture the screen with the menu perfectly displayed. No more frantic clicking.
Why Are Images Missing From My Full Page Screenshots?
Ever take a full-page capture only to find big, empty white boxes where images should be? This is a super common issue on modern websites, and the culprit is almost always a technique called "lazy loading."
To make pages feel faster, developers code them so images only load when you actually scroll down to them. The problem is that most basic screenshot tools scroll and stitch the page together so fast that these images never get the signal to load.
A more sophisticated tool, like the Full Page Screenshot feature in ShiftShift Extensions, is built specifically to handle this. It intelligently mimics how a person would scroll, pausing just long enough for all that lazy-loaded content to pop in before capturing it.
What Is The Best Image Format For Saving Screenshots?
This is a great question, and the answer is pretty straightforward for web content. For the vast majority of screenshots, PNG is your best friend.
PNG is a "lossless" format, which means it preserves every single pixel exactly as it was captured. This is absolutely critical for keeping text sharp, icons crisp, and user interface elements looking clean.
The only real exception is if your screenshot is almost entirely a photograph and you need to keep the file size as small as possible. In that specific case, a JPEG might work. But for any kind of professional work—bug reports, design feedback, training docs—stick with PNG. The clarity is worth it.
Ready to stop fighting with clunky tools and start capturing web pages the easy way? The ShiftShift Extensions suite adds a powerful, privacy-first screenshot utility right into your browser. Grab visible areas, custom selections, or entire scrolling pages with a single click. Get ShiftShift Extensions today and upgrade your workflow.